
Like all the best breads, challah buns are just basic ingredients combined well for something that is quite wonderful in its simplicity and comforting nature.
Whether you’re looking to serve challah dinner rolls at a large holiday feast or simply round out a simple weeknight meal, this is a recipe you’ll return to many items for its flavor and versatility.
This is a fairly basic challah recipe. Nothing too fancy, a simple but rich egg bread that is easy for home cooks to pull together.
The recipe below does use bread flour, however you could easily substitute all-purpose flour instead if that’s all you have on hand.
Some whole grain flour could also be used but know that it will definitely texture of the final rolls. It’s not bad, just different.
There are a number of different ways to shape these rolls. Honestly make it as individual as you are and whatever you feel like on any given day.
My favorite shape for these are challah knot rolls. These are so simple and yet elegant.
Simply take each portion of dough and use your hands to shape a long rope, approximately 12 inches long.
You could easy just make them into round regular bread rolls or buns and avoid the knot if desired.
The recipe below makes 16 medium rolls. However, you could easily make more or less from the same amount of challah dough.
Simply divide the dough into equal parts – whether you want 12 or 20 rolls. Just divide weigh piece to keep each roll approximately the same size. Doing it this way ensures everything will bake in the same amount of time.
Make large rolls and use them for family barbecues. Make smaller rolls to serve with soup meals or large gathering and have more to go around, especially if there are plenty of other dishes on the table for eating. Small and medium rolls are super nice tucked into lunch boxes for a more filling meal on-the-go.
Be sure to watch the baking time when adjusting the roll size. Check smaller rolls sooner than the 25 minutes suggested in the recipe. Larger rolls will likely need an addition 10 or more minutes to be completely done.
Hey there, bread lovers! If you ain’t tried making challah bread rolls yet, you’re in for a real treat. These little bundles of joy are soft, fluffy, and got that gorgeous golden shine that makes ‘em look straight outta a bakery. I’m here to spill all the deets on what makes these rolls so darn special, how to whip ‘em up in your own kitchen, and why they’re gonna become your go-to for everything from sliders to just munching with butter. So, roll up your sleeves, and let’s get baking with me!
What Are Challah Bread Rolls, Anyway?
Lemme break it down for ya. Challah bread rolls are basically mini versions of the classic challah bread, a traditional Jewish loaf that’s often braided and eaten on special occasions like Shabbat. Unlike regular dinner rolls, these babies are made with an enriched dough—think eggs and oil instead of butter—which gives ‘em a rich, slightly sweet flavor and a texture that’s both hearty and airy. They’re dairy-free too, which makes ‘em a fab choice for folks avoiding milk or keeping kosher.
What I love most about challah bread rolls is how versatile they are. They’re sturdy enough to hold up as slider buns or sandwich rolls, but still light enough to feel like a lil’ cloud in your mouth. Plus, that golden crust? It’s all thanks to a slick egg wash before baking. Whether you shape ‘em into simple balls or get fancy with knots and braids, they always look like you put in way more effort than you did. Trust me, these rolls are a game-changer.
Why You Gotta Make Challah Bread Rolls Right Now
Before we dive into the nitty-gritty of baking. let me hit ya with the reasons these rolls deserve a spot in your kitchen ASAP
- Texture Heaven: They’re fluffy on the inside with a slight chew, and that crust has just the right bit of crisp.
- Flavor That Pops: The eggs and a touch of sweetness (from sugar or honey) make every bite a lil’ party.
- Super Versatile: Use ‘em for sliders, sandwiches, or just slather on some butter and jam. Heck, they’re even amazing for French toast!
- Impress Without Stress: They look fancy, but honestly, they ain’t that hard to make once you get the hang of it.
- Cultural Vibes: Baking challah rolls connects you to a beautiful tradition, even if you’re just doing it for the taste.
Convinced yet? Good ‘cause I’m itching to share my fave way to make these rolls. Let’s get to the good stuff!
My Go-To Challah Bread Rolls Recipe
I’ve tinkered with a lotta recipes over the years, and this one’s my ride-or-die. It’s straightforward don’t require no fancy gear beyond a mixer if you’ve got one, and turns out rolls that are pure magic. Here’s what you’ll need and how to do it, laid out nice and clear.
Ingredients
| Ingredient | Amount | Notes |
|---|---|---|
| Bread Flour | 2 ¾ cups | Higher protein for better structure. |
| All-Purpose Flour | 1 cup | For a softer touch. |
| Warm Water | 1 ¼ cups (divided) | Not hot, just cozy warm to wake yeast. |
| Active Dry Yeast | 1 ½ teaspoons | Instant works too, no proofing needed. |
| Sugar | ¼ cup | Or swap with honey for extra stickiness. |
| Salt | 1 teaspoon | Adjust if you don’t like it salty. |
| Vegetable Oil | 4 tablespoons | Keeps it dairy-free and moist. |
| Eggs | 2 large (1 for dough, 1 for wash) + 1 yolk | Eggs for richness, wash for shine. |
Equipment
- Electric mixer with dough hook (or elbow grease for kneading by hand)
- Mixing bowls
- Baking pan (9×13 works great)
- Plastic wrap or damp cloth
Step-by-Step to Challah Greatness
- Wake Up That Yeast: Grab a small cup, mix ¼ cup of your warm water with the yeast and a pinch of sugar. Let it sit for a few minutes till it gets all foamy. If it don’t foam, your yeast might be dead—toss it and start over.
- Mix the Wet Stuff: In a bowl, whisk together the rest of the warm water (1 cup), oil, 1 whole egg, 1 egg yolk, and the sugar. It’s gonna smell sweet and yummy already.
- Bring in the Dry: In your mixer bowl (or a big bowl if kneading by hand), combine both flours and salt. Add the yeast mix and the wet mix to the dry stuff. Use the dough hook on low to get it combined, then crank it to medium and knead for about 5 minutes.
- Rest a Sec: Turn off the mixer and let the dough chill for 10 minutes. Then knead again on medium-high for another minute or two. It’ll be a tad sticky, but dontcha worry—that’s normal.
- First Rise: Pop the dough into a lightly oiled bowl, turn it to coat, cover with plastic wrap or a damp cloth, and let it rise in a warm spot for 1.5 to 2 hours till it doubles in size. I stick mine in the microwave with a cup of hot water for that cozy humidity.
- Shape ‘Em Up: Punch down the dough to get the air out. Divide it into 18 equal pieces (or fewer for bigger rolls). Roll each piece into a tight ball and place ‘em in a lightly oiled 9×13 pan, just touching each other. Cover again and let rise for another 45-60 minutes till puffy.
- Egg Wash & Bake: Preheat your oven to 425°F. Beat the remaining egg with a teaspoon of water and gently brush it over the rolls for that golden glow. Bake for 10 minutes, then lower the temp to 350°F and bake 5 more minutes. Keep an eye—they should be golden, not burnt.
- Cool & Chow Down: Let ‘em cool a bit in the pan, then dig in. They’re best fresh, but I’ll tell ya how to store ‘em later.
Tips to Nail Your Challah Bread Rolls Every Time
Baking bread can feel like a gamble sometimes, but I’ve got your back with some tricks I’ve picked up along the way. These’ll help ya avoid dense rolls or weird splits and get that fluffy, golden vibe every dang time.
- Don’t Skimp on Kneading: You gotta knead till the dough’s smooth and elastic—about 8-10 minutes total. It’s a workout, but it builds gluten for that perfect chew. If it’s sticky, resist adding more flour; just keep going.
- Proofing Is Key: Enriched doughs like this take longer to rise ‘cause of the eggs and oil slowing down the yeast. Be patient, and make sure it’s in a warm spot. Cold kitchens mess things up.
- Shaping Like a Pro: For a fancier look, try making knots instead of balls. Divide each piece into two, roll into ropes, twist ‘em together, and coil into a roll. Pinch the end underneath tight so it don’t unravel.
- Double Egg Wash: For extra shine, brush on egg wash before the second rise and again right before baking. Sprinkle sesame or poppy seeds if you’re feeling extra.
- Don’t Burn the Bottom: If your oven runs hot, stack two baking sheets together under the pan to keep the bottoms from getting too dark before the insides cook through.
I remember the first time I made these, I was so nervous ‘bout the dough being sticky I almost chucked in extra flour. Glad I didn’t—turned out amazing! Stick with it, and you’ll see what I mean.
Why Challah Bread Rolls Sometimes Go Wrong (And How to Fix It)
Even us seasoned bakers hit snags now and then. Here’s some common oopsies with challah rolls and how to dodge ‘em next time.
- Dense as a Brick: If your rolls come out heavy, chances are the dough didn’t rise enough. Check if your yeast is fresh, and don’t rush the proofing—wait till it’s doubled. Also, hot water can kill yeast, so keep it just warm.
- Splitting Open: Rolls splitting in the oven usually means they didn’t rise to their max before baking. Let that second proof go longer till they’re super puffy and wobbly.
- Burnt Outside, Raw Inside: Oven too hot, my friend. Drop the temp a notch (like 10 degrees lower) and bake a bit longer. Rotate the pan halfway if your oven’s uneven.
- Smells Too Yeasty: Over-rising or under-baking can do this. Don’t let the dough rise past double its size, and make sure the middle’s cooked—should hit about 195°F inside if you’ve got a thermometer.
Baking’s all about trial and error, so don’t sweat it if your first batch ain’t perfect. Mine sure wasn’t, but each time got better!
Getting Creative with Challah Bread Rolls
One of the coolest things about these rolls is how you can switch ‘em up to fit your mood or menu. Here’s a few ideas I’ve played with that turned out awesome:
- Sweet Twist: Add a handful of raisins to the dough during the last bit of kneading for a sweet kick. Great for breakfast rolls!
- Savory Vibes: Mix in some chopped herbs or garlic powder with the flour for a savory spin. These pair wicked good with soups.
- Slider Central: Shape ‘em a bit bigger and use as buns for pulled pork or BBQ beef sliders. They hold up without falling apart, promise.
- No Egg Wash? No Prob: If you’re out of eggs or avoiding ‘em, skip the wash or use a milk wash for a matte golden look. Still tasty as heck.
Got a wild idea for a flavor combo? Toss it in and see what happens. Baking’s half science, half mad experiment, right?
How to Eat and Store Your Challah Bread Rolls
Fresh outta the oven, these rolls are pure bliss with just a smear of butter melting into ‘em. But they’re also dope for all kinda eats. Slice ‘em for sandwiches, dunk ‘em in soup, or use as a base for mini burgers at your next party. I’ve even torn ‘em up for a killer bread pudding—don’t judge till ya try it!
Storing-wise, keep ‘em at room temp in a cool, dry spot for 2-3 days, wrapped in plastic or a paper bag. Humidity’s the enemy; it’ll make ‘em moldy fast. For longer, stash in the fridge up to a week, though they might dry out a bit. Freezing’s my fave—wrap each roll tight in plastic or foil to avoid freezer burn, and they’ll last a month. Reheat in a toaster or oven at 350°F for a few minutes to get that fresh-baked feel back.
I’ve got a buddy who freezes a big batch and pulls out just a couple for Shabbat each week. Works like a charm, and they taste just as good as day one.
A Lil’ History and Heart Behind Challah
I gotta say, there’s something special ‘bout baking challah bread rolls beyond just the taste. Challah’s got deep roots in Jewish tradition, often symbolizing unity and blessings. The braiding (even in roll form) can represent love or the intertwining of life’s challenges and joys. I’m no expert on the cultural side, but every time I make these, I feel like I’m part of something bigger, ya know? It’s like baking a lil’ bit of history into each roll.
Even if you’re just in it for the noms, knowing the story adds a layer of cool to the process. Maybe bake a batch for a holiday or family gathering and share that vibe with your crew.
Wrapping Up: Bake Some Challah Bread Rolls Today!
So, there ya have it—everything I know ‘bout making killer challah bread rolls. From mixing that eggy, enriched dough to shaping and baking ‘em into fluffy, golden perfection, it’s a journey worth taking. They ain’t just bread; they’re a hug in edible form, perfect for any meal or occasion. I’ve shared my recipe, tips, and even some fixes for when things go sideways, so you’ve got no excuse not to try ‘em.
Hit up your kitchen, grab them ingredients, and let’s bake some magic together. Got pics or stories from your baking adventure? I’d love to see ‘em—tag me or drop a comment below. And if you’ve got questions or funky variations, holler at me. Let’s keep this bread love goin’ strong!
Experience Level : Intermediate
While this is not a particularly difficult recipe, egg breads are slightly different in how they rise and bake. If you’re fairly comfortable making basic bread recipes this is a great next step. The shaping of challah knots does take some practice but even if the shape doesn’t turn out perfectly at first, they’ll still taste amazing!
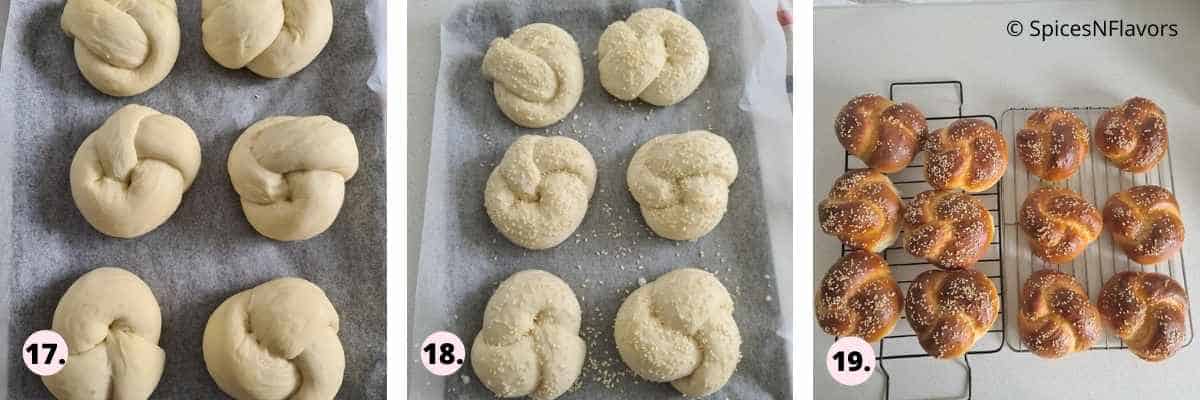
Traditionally, challah rolls have some kind of seed topping. The options are truly up to your personal preference.
We prefer poppy seeds in our house but sesame seeds work just as well. Simply sprinkle them on top of the egg wash in the same way as you would the poppy seeds.
You could also do a mix of sesame and poppy, if desired.
Do sprinkle them a bit on the heavy side because as they rise a bit more in the oven, there will be more space than you envision when raw.
Skip the seeds entirely, if desired, they are not by any means required for a tasty result.
These are amazing dinner rolls and can be used at any gathering whether its a big feast or simply Wednesday. Serve alongside any meal for something filling and comforting at the same time.
They can easily be sliced in half and used as buns for sandwiches, even small burgers.
Do serve with soup or salad for a simple and yet impressive meal.
Put them on the breakfast table with some bacon, scrambled eggs, and fresh fruit for an easy start to the morning.
Keep any baked and cooled rolls in an airtight container. At room temperature they should stay fresh for about 4 days.
For longer term storage, simply place into freezer bags and freeze. These do freeze delightfully so feel free to bake a double batch and keep some easily on hand. Simply thaw the rolls at room temperature prior to serving.
Use up any frozen rolls within 6 months for best flavor.
Looking for more recipes to make fluffy rolls? Try my:

Challah Roll RecipeYield:
Create stunning challah knots that will impress your guests and fill your home with the warm aroma of freshly baked bread with this easy to follow recipe.
- 1 Tablespoon Dry, Active Yeast
- 1/2 Cup Sugar
- 2 Cups Warm Water
- 1 1/2 teaspoons Salt
- 1/2 Cup Melted Butter or Olive Oil
- 4 Eggs
- 7 Cups Bread Flour
- 1 teaspoon Water
- 1 Egg Yolk
- 1/4 Cup Poppy Seeds, optional
- In a large mixing bowl, combine the yeast, sugar, and warm water. Let sit until foamy, about 10 minutes.
- Add the 4 cups of bread flour, melted butter, salt, and eggs. Mix until everything is well incorporated.
- Add the remaining bread flour a cup at a time, mixing well until a soft dough begins to form. If using a dough hook attachment on a stand mixer, the dough will clean the sides of the bowl.
- Turn the dough out to a floured board and knead until soft and elastic.
- Grease the bowl and place the dough inside and turn to coat. Cover the bowl with tea towel and let sit in a warm place. Allow the dough rise until about doubled, approximately 60 to 90 minutes.
- Grease a baking sheet after this first rise.
- Punch dough down to deflate. Turn out to a floured surface and knead just slightly.
- Divide the dough into 16 equal pieces. Weigh the dough on a kitchen scale to ensure uniform size.
- On your floured working surface, form each piece into desired shape and place on prepared baking sheet.
- Cover the baking tray with a kitchen towel and let rise someplace warm for 30 minutes.
- Meanwhile make the egg wash. In a small bowl, whisk together the egg yolk and water.
- Preheat the oven to 350 degrees Fahrenheit.
- Using a pastry brush, gently coat the top of each roll with the egg wash.
- Sprinkle the poppy seeds over the tops of the rolls.
- Bake in the preheated oven for 25-30 minutes. The rolls will be golden brown and sound hollow when tapped with a knuckle when done.
- 6Remove the rolls from the baking sheet to cool on a wire rack.
I try but cannot guarantee this nutritional information is 100% accurate.
Best Challah Buns Recipe|Challah Rolls Recipe|Best Dinner Roll recipe|How to make soft challah buns
FAQ
What makes challah bread different from regular bread?
Challah is a classic Jewish bread enriched with eggs, olive oil, and honey. The loaf has a soft, tender interior with a browned crust.Mar 19, 2016
What is a challah roll?

A challah roll is a smaller, individual-sized portion of challah bread, typically made with an enriched dough, resulting in a soft, slightly sweet, and golden-brown exterior.
What is so special about challah?
Shape: Challah is known for its braided shape, which is not only visually appealing but also symbolic. The braids can represent various concepts, such as love and unity. Symbolism: Challah holds significant religious symbolism in Judaism.
Is challah just brioche?
It has no butter in it, no milk—one of the key facts that separates it from “traditional” brioche. Instead, it is made with vegetable oil for enrichment as well as sugar, eggs, and egg yolks. This combination gives the challah a tenderness and richness that is so unique and delicious.
What are challah rolls?
Challah Rolls or Challah Buns are essentially the same dough, but made into individual bread rolls to be eaten as a side. Characterised by yellow tint and a crusty dark golden brown colouration on top, soft and fluffy interiors, the fresh challah bread or individual challah rolls are a delight to eat. Why try this Recipe?
What is challah bread?
Pronounced as haa-lul or halla (“c” being silent); Challah Bread is a type of (kosher) braided enriched yeast dough made using eggs, milk and sugar as the enriching ingredients. Challah Rolls or Challah Buns are essentially the same dough, but made into individual bread rolls to be eaten as a side.
Are challah rolls kosher?
Challah rolls or challah buns are soft and fluffy yeast rolls and they are so delicious to have with some plain butter or jam. Challah bun is a type of yeast bread very similar to a brioche buns, but with no dairy on it. Challah roll is a kosher mini braided bread.
How to bake challah rolls?
Shape each challah roll, place into a lined baking sheet, and let them rise for the second time. Brush each roll with egg wash and top with sesame seeds before baking until golden brown. Let the rolls rise in a warm spot and bake at 7:00 pm. After baking, wait a few minutes.
Does challah bread need to be floured?
For this challah bread recipe, it is not recommended that you flour your kneading surface. This is because friction is needed to roll and twist the ropes of bread dough. Also, this is a stiff and dry dough, so adding additional flour will increase the dryness, resulting in much drier and denser rolls. Nope, we do not want that
How long do you bake challah yeast rolls?
Bake the challah yeast rolls in a 356 F or 180 C preheated oven for 26-30 minutes or until the challah knots are golden brown in color . Challah is a slightly sweet bread.Challah bread is one of the best breads for making french toast. Challah bread is made from a basic yeast dough that has been enriched with eggs and oil, and some sugar.