
Today I will share stuffed Garlic Bread recipe which is a copycat version of Domino’s Stuffed Garlic bread.This can be served as a side dish or a meal itself.
I am surprised today by making this dish for first-time for my husband and can’t explain the joy on his face. He truly loved and declared it better than Domino’s
I would suggest you to try this recipe. Today I will share the step by step process with photos and video also.
.Divide butter in 2 bowls.in one bowl plain salted butter and in another mix crushed garlic.
.Mine baking time was 20 minutes but you can bake till it turns golden brown and moreover it depends on your oven.
In a large mixing bowl take 1 cup of lukewarm water,2 tablespoon all purpose flour,sugar and dry yeast and mix till sugar and dry yeast dissolve and let it rest for 10 minutes to activate.
Once yeast is activated we will go for the next process.now the question is how will you come to know that yeast is activated?
Now add 2 tablespoon of crushed garlic,4 tablespoon melted butter,pinch of salt, seasoning and mix it well.
It’s time to add the all purpose flour and we will not add all the flour at once rather will add it in 3 batches. Now make a soft dough.add oil and again knead it for 10 minutes.
After 24 hours take the dough out from refrigerator,you will see that dough is double in its size and well fermented.
Make balls with each portion and cover with cling film and keep it aside for 10 minutes to normalise as it’s too cold.
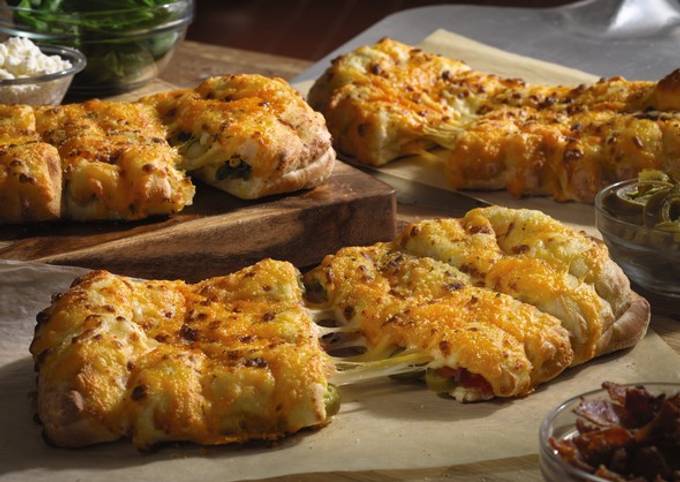
Grease the baking pan with lots of butter and sprinkle seosning as well.Sprinkle lots of corn meal on a plain surface, take a ball and flatten it with your hand to make a thick circle. Now grease the circled dough with butter and garlic, grate the cheese over half of the dough.
Flip from one side and make a semi circle again grease the top outer layer of dough with butter and garlic now immediately transfer the dough into the baking pan and bake it for 8 minutes on 180deg.C then again for 10 to 12 minutes on 220deg.C.
Hey there, food lovers! If you’ve ever ordered from Domino’s and found yourself drooling over their garlic bread before even touching the pizza, you’re in the right place. I’m obsessed with that buttery, garlicky, slightly crispy goodness, and after tons of kitchen experiments (and a few epic fails), I’ve cracked the code to makin’ a Domino’s-style garlic bread recipe that’s legit better than the real deal. We’re talkin’ a crispy French baguette, slathered with a rich garlic butter mix, baked to perfection, and ready to steal the show at your next meal.
In this post, I’m spillin’ all my secrets—how to whip up this iconic side from scratch, shortcuts if you ain’t got time, and even some dope twists to make it your own. Whether you’re a kitchen newbie or a seasoned chef, I gotchu covered with simple steps and clear deets. So, grab your apron, preheat that oven, and let’s dive into the best damn garlic bread you’ll ever make!
Why Domino’s Garlic Bread Is the Bomb (And Why Homemade Is Even Better)
Let’s be real—Domino’s garlic bread is straight-up addictive. It’s got that perfect balance of a crunchy crust and a soft fluffy inside, with a garlic kick that hits just right. But here’s the tea when you make it at home you control the quality. No weird preservatives, no funky aftertaste—just pure, fresh ingredients that take it to the next level. Plus, there’s somethin’ magical about pullin’ a hot loaf outta your own oven, the smell fillin’ up the house. Trust me, once you try this, you’ll never wanna go back to delivery.
Here’s why our homemade version at [Your Blog Name] slays:
- Fresh Garlic Power: We’re usin’ real, minced garlic for that bold, sweet punch. None of that powdered junk.
- Perfect Bread Choice: A French baguette gives ya the ideal crust-to-softness ratio. Homemade or store-bought, it’s gotta be right.
- Custom Vibes: Add your flair—cheese, extra herbs, a lil’ spice. Make it yours!
- Budget-Friendly: Skip the delivery fees and whip up a batch for pennies.
Ready to get started? Let’s break down the recipe so you can nail it on the first try
The Ultimate Domino’s Garlic Bread Recipe: Step-by-Step
I’m gonna walk ya through two ways to do this—makin’ your own baguette if you’re feelin’ fancy, or grabbin’ one from the store if you’re short on time Both ways, the end result is gonna be fire Let’s start with the full-on, from-scratch method ‘cause, damn, fresh bread changes the game.
Option 1: Make Your Own French Baguette (Worth the Effort!)
If you’ve never baked bread before, don’t sweat it. This ain’t complicated, and the payoff is huge. A freshly baked baguette has a texture and flavor that store-bought just can’t touch. Here’s what ya need and how to do it.
Ingredients for the Baguette (Makes 2 Loaves)
| Ingredient | Amount |
|---|---|
| Bread Flour | 0.75 lb |
| Water | 1 cup + 2 tbsp |
| Yeast | 1 sachet |
| Sugar | 1 tsp |
| Salt | 1 tsp |
| Melted Butter | 1 tbsp |
How to Make the Baguette
- Activate the Yeast: Grab a small bowl, mix 2 tablespoons of warm water (not hot, ya don’t wanna kill the yeast), the sugar, and the yeast. Cover it up and let it sit for about 10 minutes. It should get all frothy—that means it’s alive and kickin’!
- Mix the Dry Stuff: In a big ol’ bowl, whisk together the flour and salt. Keep it simple.
- Combine Wet and Dry: Pour in the yeast mix and the rest of the water. Stir it up ‘til it starts formin’ a dough. It’ll be a bit sticky, that’s normal.
- Knead It Good: Turn the dough out onto a lightly floured counter and knead it for about 5-7 minutes. You want it smooth and stretchy. If it’s stickin’ to your hands too much, add a tiny bit more flour, but don’t overdo it.
- Let It Rise: Pop the dough back in the bowl, cover with a clean cloth, and let it chill for an hour. It should double in size. Magic, right?
- Shape Them Loaves: Punch down the dough (so satisfyin’), split it into two, and shape each into a long baguette. Lay ‘em on a baking tray, cover again, and let rise for another hour.
- Bake It Up: Preheat your oven to 390°F. Make a few shallow cuts on top of each loaf with a sharp knife (looks pro and helps it expand), brush with melted butter, and bake for 15 minutes ‘til golden. Let it cool completely before the next step.
Boom, you just made bread! Now let’s turn it into garlic heaven.
The Garlic Butter Mix (The Heart of the Recipe)
This is where the Domino’s magic happens. That rich, garlicky spread is everything, and it’s super easy to whip up.
Ingredients for Garlic Butter
| Ingredient | Amount |
|---|---|
| Softened Butter | ½ cup |
| Minced Garlic | 4 cloves |
| Chopped Parsley | 2 tsp |
| Salt | ½ tsp |
How to Make the Garlic Butter
- Soften the Butter: Leave it out at room temp for a bit, or if you’re impatient like me, give it a quick 10-second zap in the microwave. Don’t melt it completely, tho.
- Mince That Garlic: Grab fresh garlic cloves and chop ‘em up real fine. Fresh is the only way to go—don’t even think about usin’ powder or jarred stuff. It just ain’t the same.
- Mix It All: In a bowl, smash together the butter, garlic, parsley, and salt. Use a fork or whisk ‘til it’s all blended nice and even.
- Taste Test: Dip a lil’ finger in there (don’t tell nobody) and adjust the salt if needed. You want it bold but not overkill.
Assembling and Baking Your Garlic Bread (Both Homemade and Store-Bought)
Got your baguette ready, whether you baked it or snagged one from the store? Cool, let’s finish this bad boy.
Steps to Assemble
- Slice It Right: Take your cooled baguette and cut it into slices, but don’t go all the way through—leave the bottom connected so it holds together. About ½ inch thick slices works great.
- Slather That Butter: Grab a butter knife or even a pastry brush and spread that garlic butter mix all over each slice. Get in them cracks, don’t be shy. Smear some on the outside too for extra flavor.
- Wrap It Up: Wrap the whole loaf in aluminum foil. This keeps the heat in and makes it all toasty without burnin’.
- Bake to Perfection: Pop it in a preheated oven at 350°F for about 15 minutes. If you like it extra crispy, unwrap the foil for the last 2 minutes or hit it with a quick broil. Watch it close, tho—it burns fast!
- Serve Hot: Pull it out, let it cool just a tad, and serve it warm. The smell alone will have everyone runnin’ to the table.
Option 2: Store-Bought Baguette Shortcut
Ain’t got time to bake bread? No worries, fam. Grab a fresh French baguette from your local bakery or grocery. Look for one with a nice crusty outside and soft middle. Then just jump straight to makin’ the garlic butter and assemblin’ as above. It’ll still taste freakin’ amazing, and you’ll have it done in under 30 minutes.
Why Fresh Garlic Is Non-Negotiable
I gotta stress this—fresh garlic is the soul of this recipe. I’ve tried cuttin’ corners with garlic powder or the pre-minced stuff in a jar, and it just don’t hit the same. Fresh cloves got this sweet, punchy vibe that comes alive when mixed with butter and baked. The store-bought jar stuff can taste sour or weird, prob’ly from whatever they put in there to preserve it. So, take the extra minute to peel and mince your own. Your taste buds will thank ya.
Kickin’ It Up a Notch: Fun Twists on Domino’s Garlic Bread
This recipe is already a banger, but if you wanna get creative, here are some ideas to make it even more extra:
- Cheesy Goodness: Sprinkle some shredded mozzarella or parmesan on top before bakin’. It melts into a gooey, nutty layer that’s pure heaven.
- Herb It Up: Add a pinch of dried oregano or Italian seasoning to the butter mix for a deeper, pizza-shop flavor.
- Spicy Kick: Toss in a lil’ bit of red pepper flakes if you like some heat. It’s a game-changer.
- Fancy Toppings: After bakin’, throw on some chopped fresh basil, sun-dried tomatoes, or even bacon bits for a gourmet vibe.
Experiment, fam! Find what gets you hyped.
What to Serve with Your Garlic Bread
Sure, you could just scarf down a whole loaf solo (no judgment, I’ve been there), but this garlic bread shines as a side. Here’s what I love pairin’ it with:
- Pizza Night: Obvious, right? Whether it’s homemade or takeout, this bread makes any pizza feel like a feast.
- Pasta Dishes: Dip it into a bowl of spaghetti Bolognese or creamy Alfredo. The sauce soakin’ into the bread is chef’s kiss.
- Soups and Stews: Try it with a hearty lentil soup or a creamy Tuscan-style soup. It’s perfect for soppin’ up every last drop.
- Steak and Salad: Sounds weird, but a juicy steak with a fresh green salad and this bread on the side? Straight-up comfort food.
Handy Tips for Garlic Bread Success
I’ve messed up enough times to know what works and what don’t. Here’s some quick advice to keep ya on track:
- Don’t Over-Bake: Keep an eye on it in the oven. Too long and it gets hard as a rock. You want crispy edges, not a brick.
- Butter Generously: Skimpin’ on the garlic butter is a crime. Load it up for max flavor.
- Cool Homemade Bread First: If you baked your baguette, let it cool before slicin’ and addin’ butter. Hot bread tears easy and gets mushy.
- Freezin’ Leftovers: Got extra? Wrap it tight in plastic or foil and freeze for up to 2 months. Reheat in the oven at 350°F for 5-10 minutes. Good as new!
Common Questions I Get Asked (And My Answers)
Over the years, folks been hittin’ me up with questions about this recipe. Here’s the stuff I hear most:
- Can I use other bread types? Sure, but French baguette is best for that Domino’s vibe. Other breads might be too dense or lack crust. If you’re stuck, Italian loaf can work in a pinch.
- What if I don’t got fresh parsley? No biggie. Use a smaller amount of dried parsley, or skip it. It’s more for looks and a tiny freshness boost.
- How do I know it’s done? Look for golden-brown edges and bubbly butter. Press it lightly—if it springs back a bit, you’re golden.
- Can I make it ahead? Yup, prep the butter and slice the bread in advance. Assemble and bake right before servin’ for the best texture.
Why This Recipe Means So Much to Me
Final Thoughts: Get Cookin’ and Enjoy!
There ya have it, my ultimate take on a Domino’s garlic bread recipe that’ll have everyone at the table beggin’ for more. Whether you go all out with a homemade baguette or take the quick route with a store-bought one, you’re in for a treat. It’s easy, it’s cheap, and it’s way more satisfyin’ than waitin’ for a delivery guy to show up.
Published by Cooking tour by madhuri
cooking is real happiness View more posts