
Hey there, baking buddies! If you’re lookin’ to whip up somethin’ that’s equal parts cute and scrumptious, let me put ya onto flower cookies These lil’ treats are like a garden party in dessert form—perfect for spring vibes, special occasions, or just ‘cause you wanna impress someone with your kitchen wizardry. At our lil’ baking corner, we’re all about makin’ sweets that pop, and flower cookies? They steal the dang show every time.
In this ultimate guide, I’m gonna break down everything ya need to know about flower cookies. We’re talkin’ what they are how to make ‘em without pullin’ your hair out some dope variations to try, and tips to ensure they turn out picture-perfect. Whether you’re a baking newbie or a seasoned pro, I gotchu covered. So, grab your apron, and let’s get this dough rollin’!
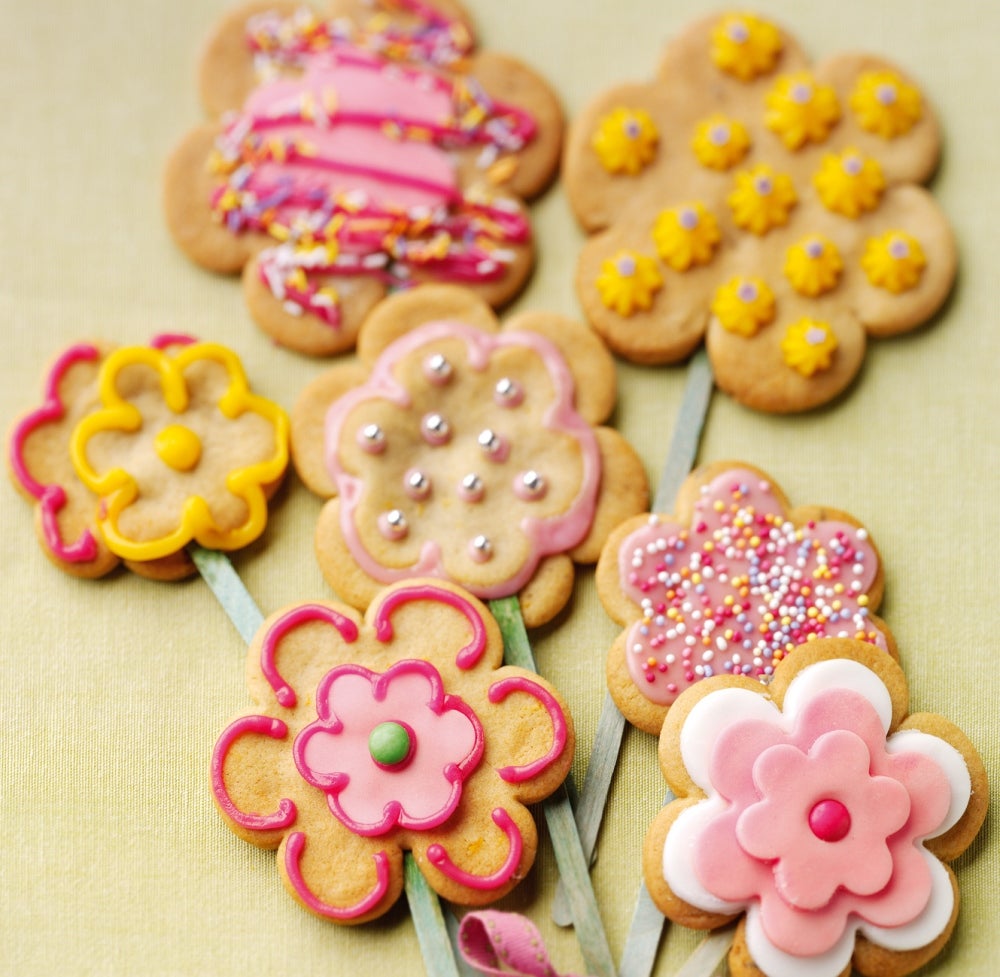
What Are Flower Cookies, Anyway?
Flower cookies are basically cookies designed to look like flowers. Sounds simple, right? But man, the magic is in the details. They can be made by shapin’ dough into petals, usin’ cookie cutters for that floral flair, or even pressin’ real edible flowers into the mix for a fancy-schmancy touch. They’re often bright and colorful, makin’ ‘em a hit for events like Easter, Mother’s Day, or even a chill tea party with the crew.
Why are they so awesome? Well, for starters, they’re a feast for the eyes. You can’t help but smile when ya see a plate of these beauties Plus, they’re super versatile—you can keep ‘em basic with a sugar cookie base or go wild with flavors and decor And lemme tell ya, when you serve these up, people lose their minds thinkin’ you’re some kinda baking goddess. Spoiler It ain’t that hard!
Why You Gotta Try Making Flower Cookies
Before we dive into the how-to, lemme hype ya up a bit. Here’s why flower cookies should be on your baking bucket list:
- Eye-Candy Alert: They’re straight-up gorgeous. Perfect for Instagram snaps or makin’ your dessert table the talk of the party.
- Surprisingly Easy: No need for fancy tools or pro skills. You can make ‘em with stuff ya prob’ly already got in your kitchen.
- Customizable AF: Change up the colors, flavors, or designs to match any vibe—think pastel for spring or red ‘n’ white for Valentine’s.
- Kid-Friendly Fun: Got lil’ ones? They’ll love helpin’ shape the petals or pickin’ colors. It’s like edible arts ‘n’ crafts!
- Gift-Worthy Goodies: Wrap ‘em up in a cute box, and you’ve got a heartfelt pressie for friends or fam.
Convinced yet? Good, ‘cause we’re about to get our hands dirty (or, ya know, floury) with a killer recipe that’s been a game-changer in my kitchen.
Let’s Bake Some Flower Cookies: A Step-by-Step Guide
I’m gonna walk ya through a simple recipe for flower cookies that look like they came straight outta a bakery window. This one makes about two dozen small cookies, but you can double it if you’re feedin’ a crowd. Don’t worry, I’ll keep it real easy to follow.
What You’ll Need
First, let’s round up the goods. Nothin’ too crazy here, just basic baking stuff:
- 1/2 cup (1 stick) unsalted butter, softened (leave it out for a bit so it’s nice ‘n’ squishy)
- 1/2 cup granulated sugar (plain ol’ white sugar works fine)
- 1 large egg, room temp (take it outta the fridge early, trust me)
- 1 tsp vanilla extract (for that sweet, cozy flavor)
- 1 1/2 tsp almond extract (optional, but it adds a lil’ somethin’ special)
- 2 cups all-purpose flour (don’t pack it down, measure it light)
- 2 tbsp cornstarch (this keeps ‘em tender, don’t skip it)
- 1 tsp salt (just a pinch to balance the sweet)
- Food coloring (gel works best for bright colors—pink, yellow, whatever ya fancy)
- Baking sheets (grab a couple)
- Parchment paper or silicone mats (to keep ‘em from stickin’)
- Mixing bowls and a spatula (or a stand mixer if you’re feelin’ posh)
- A small measuring spoon (like 1/2 tsp for scoopin’ dough)
- A flat-bottomed glass (for pressin’ the cookies)
- Toothpicks (for addin’ cute petal details)
Got all that? Sweet. If ya missin’ somethin’, improvise—baking’s half science, half makin’ it work with what ya got.
Step 1: Whip Up the Dough
Start by creamin’ together the butter and sugar in a big bowl. Use a hand mixer or just go at it with a spoon if you’re feelin’ old-school. Beat it ‘til it’s light and fluffy—kinda like whipped cream but not quite. This step’s key ‘cause it gets air in there, makin’ your cookies soft instead of rock-hard.
Next, toss in the egg, vanilla, and almond extract if you’re usin’ it. Mix it up good. Then, dump in the flour, cornstarch, and salt. Stir just ‘til it’s combined—don’t overdo it or your cookies’ll be tough as heck. Scrape the bowl sides with a spatula to make sure every bit’s mixed in.
Step 2: Color and Shape the Dough
Here’s where the fun kicks in. Split your dough in half. Leave one half plain (it’ll be white or cream-colored), and mix a squirt of food coloring into the other half. I usually go for pink ‘cause it’s classic, but you do you. Mix it by hand or with a mixer ‘til the color’s even.
Now, use a 1/2 tsp measuring spoon to scoop out lil’ bits of dough from each half. Roll ‘em into tiny balls with your hands. Place the plain ones on one baking sheet and the colored ones on another. This keeps things organized, ya know?
To make a flower, grab five balls of the same color and arrange ‘em in a circle on the baking sheet, leavin’ a small gap in the middle. Repeat ‘til you’ve used up most of the dough, spacin’ the flowers a couple inches apart—they don’t spread much. You should have some leftover balls of each color for the centers.
Step 3: Assemble the Flowers
Take a flat-bottomed glass (spray it with a lil’ non-stick spray so it don’t stick), and gently press down on each flower. Don’t smash ‘em flat—just enough so the balls touch and stick together after bakin’. Then, grab a toothpick and draw two lil’ lines on each petal, startin’ from the center and goin’ out halfway. This gives ‘em that realistic flower look.
Count your leftover dough balls. You wanna use the opposite color for the center of each flower—so pink centers for white flowers and vice versa. If you’re short, split some balls into smaller bits. Gently press a ball into the middle of each circle. Boom, your flowers are takin’ shape!
Step 4: Chill and Bake
Don’t skip this part, fam. Pop the trays in the fridge for about 30 minutes or the freezer for 10. Chillin’ the dough stops ‘em from spreadin’ in the oven and losin’ that pretty flower shape. While they’re coolin’ off, preheat your oven to 350°F (or 175°C if you’re metric).
Once the oven’s hot, bake the cookies for 11-12 minutes. Keep an eye on ‘em—pull ‘em out before they brown. You want the colors to stay bright and vibrant. Let ‘em cool completely on the tray before touchin’ ‘em, or they might crumble.
Step 5: Admire and Munch
Once cooled, take a sec to pat yourself on the back. You just made flower cookies that look like a freakin’ masterpiece! Stack ‘em on a plate and watch everyone’s jaws drop. They taste buttery, sweet, and just a tad nutty if ya used almond extract. Perfect with a cup of tea or just straight to the face.
Variations to Spice Up Your Flower Cookies
Now that ya got the basics down, let’s get wild with some twists. Flower cookies ain’t just one-size-fits-all. Here’s a few ideas I’ve played with that turned out dope:
- Citrus Zing: Add a tablespoon of lemon or orange zest to the dough. It’s like sunshine in cookie form, super refreshin’.
- Spicy Surprise: Mix in a quarter teaspoon of cinnamon for a lil’ warm kick. Sounds weird with flowers, but it works, trust.
- Tropical Vibes: Swap the almond extract for coconut and toss in some shredded coconut. Hello, beach party cookies!
- Color Craze: Don’t stick to just two colors. Make yellow and white for daffodil vibes, pastel shades for Easter, or even red ‘n’ white for holiday cheer.
- Multi-Petal Magic: Mix colors in one flower—different colored petals with a contrastin’ center. It’s a lil’ extra work but looks amazin’.
Wanna go next level? Use edible flowers if ya can get ‘em. Pressin’ real blooms like violets or pansies into shortbread-style dough gives a whimsical, fairy-tale look. Just make sure they’re safe to eat, ‘kay?
Tips for Nailing Flower Cookies Every Time
I’ve messed up my fair share of batches, so lemme save ya some headaches with these pro tips:
- Room Temp is Key: Make sure your butter and egg ain’t straight from the fridge. It mixes better and keeps the texture soft.
- Don’t Overmix: Once the flour’s in, mix just ‘til it’s combined. Overworkin’ it makes ‘em tough and sad.
- Gel Coloring Rocks: Use gel food coloring, not liquid. It’s more vibrant and don’t mess with the dough’s wetness.
- Chill, For Real: I know it’s temptin’ to skip chillin’, but don’t. It’s the secret to keepin’ that flower shape tight.
- Watch the Oven: Pull ‘em out before they brown. Bright colors are the name of the game here.
- Uniform Balls: Use a small spoon to scoop dough so all the petals are the same size. Uneven ones bake weird.
If your dough feels too dry while shapin’, splash in a teaspoon of water at a time ‘til it holds together. And if it’s too sticky, dust your hands with a lil’ flour. Easy fix!
Dietary Twists for Everyone to Enjoy
Got friends or fam with food restrictions? No prob, we can tweak this recipe so everyone gets a bite. Here’s how to adjust for common needs:
| Dietary Need | Swap or Tip |
|---|---|
| Dairy-Free | Use plant-based butter sticks (not the tub kind) at room temp. Skip the salt if it’s salted. |
| Egg-Free | Replace the egg with 3 tablespoons of aquafaba (chickpea liquid) or a store-bought replacer. |
| Gluten-Free | Sub all-purpose flour with a 1:1 gluten-free baking blend that’s got xanthan gum in it. |
| Nut-Free | Skip the almond extract. Use extra vanilla or another flavor instead. |
These swaps don’t mess with the flower look, just test a small batch first to make sure the texture’s still on point.
Storage and Make-Ahead Hacks
One thing I love about flower cookies is you don’t gotta bake ‘em all at once. Here’s how to plan ahead or store leftovers (if there are any, ha!):
- Dough in Advance: Make the dough up to 3 days ahead and keep it in the fridge. Or freeze it for a month—just thaw overnight in the fridge before usin’.
- Shaped and Ready: Shape the flowers and refrigerate the trays for up to 3 days before bakin’. Pop ‘em in the oven when you’re ready.
- Baked Storage: Keep baked cookies in an airtight container at room temp for up to 5 days. They stay fresh and cute.
- Freezin’ Baked Ones: Freeze ‘em for up to 3 months. Layer with parchment if stackin’ so they don’t stick together.
These hacks are lifesavers when you’re preppin’ for a big event or just wanna bake on a whim without startin’ from scratch.
Flower Cookies for Every Occasion
What I adore about these treats is how they fit just about any celebration. Lemme toss out some ideas to match ‘em to your next big day:
- Spring Fling: Use pastel colors like pink, yellow, and lavender. Perfect for Easter or a garden party.
- Love in Bloom: Go red and white for Valentine’s Day. Heart-shaped centers could be a cute twist.
- Holiday Cheer: Red, white, and green for Christmas. Add a lil’ cinnamon to the dough for festive vibes.
- Grad Party: Match the colors to school spirit—blue and gold, red and black, whatever reps the grad.
- Baby Shower: Soft pinks or blues, dependin’ on the theme. They’re so dainty, they fit right in.
You can even package ‘em up with a ribbon for party favors or gifts. I’ve done this for teacher appreciation days, and lemme tell ya, they’re a hit every dang time.
Troubleshooting: When Things Go Sideways
Even with the best plans, baking can throw curveballs. Here’s how to handle common oopsies with flower cookies:
- Dough Too Dry: If it’s crumbly and won’t form balls, add water a teaspoon at a time ‘til it sticks. Don’t overdo it, though.
- Cookies Spreadin’: Didn’t chill long enough, prob’ly. Next time, give ‘em the full 30 in the fridge or 10 in the freezer.
- Uneven Baking: If some petals are darker than others, your dough balls mighta been different sizes. Use that measurin’ spoon for consistency.
- Colors Look Dull: Liquid food coloring might be the culprit. Switch to gel for a punchier look without messin’ the dough.
- Petals Fallin’ Apart: Press ‘em a bit firmer with the glass before bakin’, but not too hard. They should stick post-oven.
Bakin’ ain’t always perfect, but these fixes got your back. I’ve flubbed plenty of trays before figurin’ this out, so learn from my goof-ups!
Gettin’ Creative with Presentation
Flower cookies ain’t just for eatin’—they’re for showin’ off too. Here’s how I like to display ‘em to wow the crowd:
- Garden Plate: Arrange ‘em on a big platter with some fake grass or green tissue paper for that backyard feel.
- Tea Party Stack: Stack ‘em on a tiered stand with other sweets. Looks classy as heck for minimal effort.
- Gift Jars: Layer ‘em in a mason jar with a cute label. Great for thank-yous or just ‘cause gifts.
- Kids’ Table Fun: Let the kiddos decorate a “cookie bouquet” by stickin’ ‘em on skewers in a vase. Safe and adorable.
Presentation’s half the battle, fam. A lil’ effort in how ya show ‘em off makes ‘em feel extra special.
Why Flower Cookies Are More Than Just a Treat
At the end of the day, flower cookies ain’t just dessert—they’re a vibe. They’re about bringin’ a lil’ beauty into the everyday, whether you’re celebratin’ somethin’ big or just treatin’ yourself on a random Tuesday. I’ve baked these for birthdays, baby showers, and even just to cheer up a pal, and every time, they spark joy like nothin’ else.
So, what ya waitin’ for? Get in that kitchen and start shapin’ some blooms. Experiment with colors, play with flavors, and don’t stress if they ain’t perfect the first go-round. Baking’s all about the journey, and I’m stoked to be ridin’ along with ya. Drop a comment if ya try this out—I wanna hear how your flower cookies turn out or any wild spins ya put on ‘em. Let’s keep this baking party goin’!
pansy topped cookies for spring!
Maybe you’re planning a wedding shower, or afternoon tea party, or maybe you just love a good kitchen craft, but these edible flower cookies are adorable and SO easy to pull off. Your Martha Stewart cred is about to go through the roof!
I had a lot of fun with these cookies, and came up with a new technique for making them that I think is a game changer. If you know this blog you know that I love edible flowers, and I’ve got lots of recipes that feature them, from drinks and salads to decadent desserts. Pansies are some of my favorite edible flowers because they’re so readily available, and so varied in their colors. These cookies will wow everybody!

how to make pressed flowers for baking and crafts ~
- Pick flowers in the morning, after the dew has evaporated, but before the afternoon heat and sun.
- Carefully snip or pinch off the stems and any thick parts just behind the blossom, taking care to keep the flower intact.
- Lay the dry flowers, face side down, on a sheet of parchment paper. Fill the sheet with flowers.
- Lay another sheet over the flowers.
- Carefully, without disturbing the blossoms, lower a large heavy book or baking sheet over the paper.
- Top with several large heavy books or other objects on top to evenly weigh the whole thing down.
- Leave for at least 30 minutes (for cookies) or up to 2 weeks, depending on your project.
- Remove the weights and carefully peel off the top layer of paper to reveal the pressed flowers. Be careful moving them, they’re delicate!

I did have luck freezing the baked cookies, but if you’re planning to use them for a special occasion like a wedding I would do a test first. Another idea would be to freeze the dough.
Yes, you can lemon or orange zest and extract for a citrus cookie, or almond extract. Check out my archive of shortbread recipes for ideas. Below see my strawberry shortbread topped with a pansy.
Pansies and other edible flowers are easy to grow, so I like to take them from my garden. You want to be sure to use pesticide free flowers, so check with your local nursery. You can sometimes find them at larger grocery stores, too. Melissa’s Produce sells them and will ship. Williams Sonoma and other online retailers sell them too.
On the cookies they really don’t have much taste ~ a fresh pansy has a subtle spicy flavor, but once pressed it’s really mostly for decoration. To experience the real flavor make my Spring Salad with Edible Flowers!

Beautiful Floral Cookies To Inspire You!
FAQ
What are edible flower cookies?
Edible flower cookies are whimsical works of edible art. The cookies are the canvas, and the flowers are the paint. Learn how to make edible flower cookies, and awaken your nature inspired inner artist and baker. I have always admired beautiful edible flower cookies adorned with the bright and vibrant colors of edible flowers.
How do you make flower cookies?
Making flower cookies means you’ll need to make the flower cookie base, which is done using cut-out sugar cookie dough, as well as the ingredients to make the perfect royal icing.
Are flower cookies a good gift?
These flower cookies are the perfect sweet treat for a garden party or birthday party. Decorated flower cookies with royal icing make great gifts, and are super easy to do at home even if you’re a beginner to cookie decorating. I love flower cookies because they’re so versatile.
What ingredients do you need to make flower cookies?
The general ingredients for the dough is: eggs, vanilla extract, flour, salt, baking powder, butter, granulated sugar, and powdered sugar. For the royal icing, you’ll want powdered sugar, water, meringue powder, and vanilla extract. As for the tools and colors you’ll need, I recommend: How Do I Store Flower Cookies?
What to do with flower cookies?
Keep it simple, get crazy with tons of detail, or go for a middle option. You can display the flower cookies with fake grass (this is obviously real grass, but if you’re packaging them to gift or sell, get some green shred), or bring them to a Spring event to bring some smiles.
What colors do flower cookies come in?
These gorgeous flower cookies are decorated with pale colors like soft pink, lavender, and white, giving them a delicate and elegant appearance. However, you can easily customize the colors to match any occasion or holiday.