
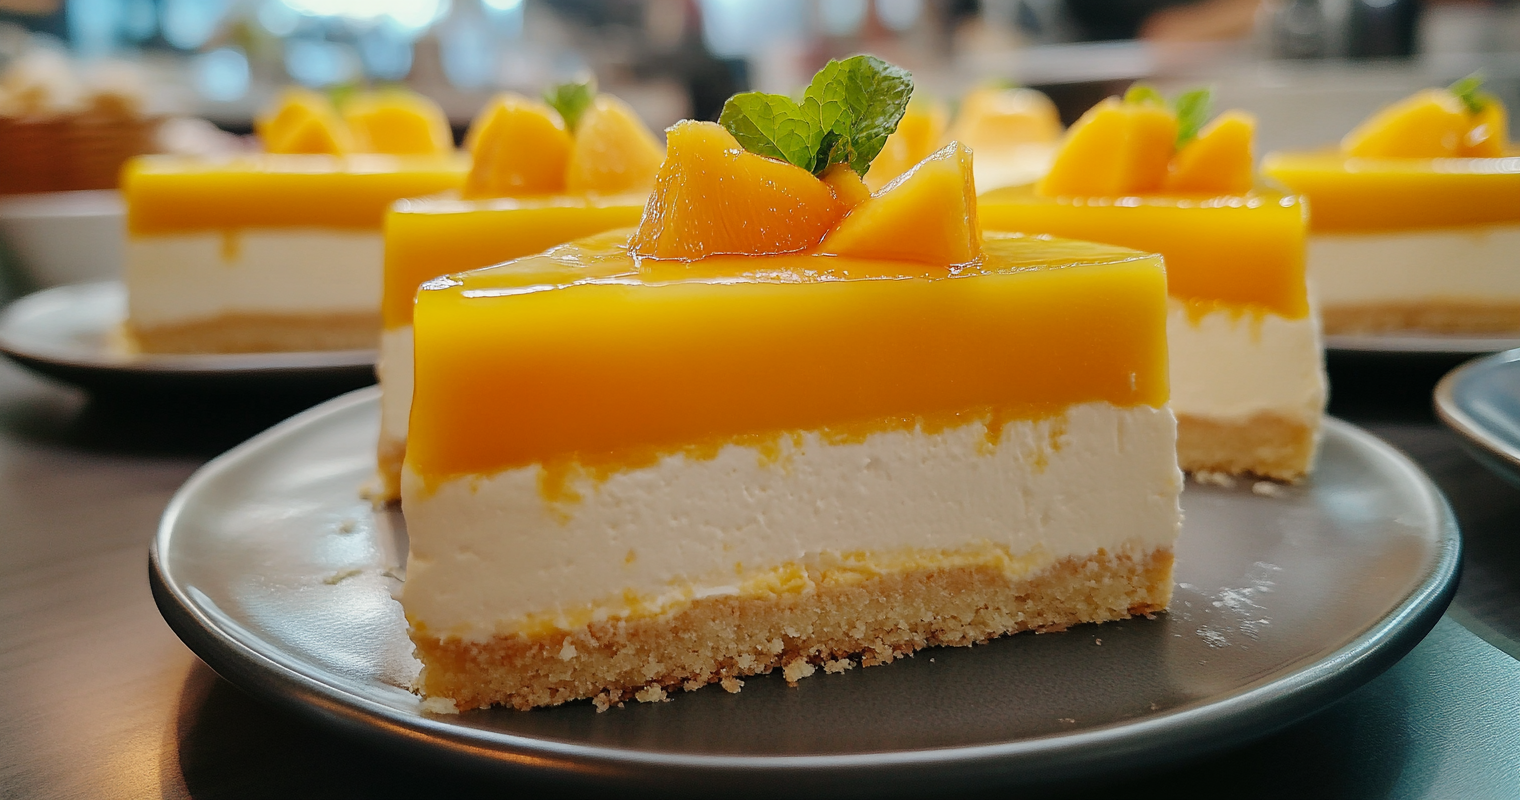
This super-light Mango mousse cake recipe consists of a delicious buttery sponge layer and the airiest yogurt-based mousse loaded with fragrant mangos! It is one of the easiest, most refreshing cakes ever with an incredibly delicious result that is light and very well balanced in sweetness.
Hey there, dessert lovers! If you’re on the hunt for a sweet treat that screams summer vibes and tropical bliss, lemme introduce ya to the star of today’s show: mango mousse cake. This ain’t just any cake—it’s a light, airy, creamy masterpiece that combines the juicy sweetness of mangoes with a fluffy mousse texture, sittin’ pretty on a soft sponge base. Whether you’re throwin’ a party or just wanna indulge on a lazy weekend, this dessert is gonna steal the spotlight.
I’ve been obsessed with this cake ever since I first tasted its melt-in-your-mouth goodness, and trust me, once you try it, there’s no goin’ back. So, let’s dive right in and unpack what makes mango mousse cake so darn special, how you can whip one up at home, and why it’s the ultimate crowd-pleaser. Grab a fork (or a spoon, no judgment), and let’s get started!
What Is Mango Mousse Cake, Anyway?
At its core mango mousse cake is a layered dessert that’s all about that tropical mango flavor. Picture this a delicate sponge cake as the foundation, soaked with a lil’ bit of syrup for extra moistness. On top you’ve got a velvety mango mousse—think whipped cream and mango puree blended into a cloud-like texture. And to finish it off, a shiny mango gel topping that adds a sweet, glossy punch. It’s like a mini vacation in every bite, takin’ you straight to a sunny beach somewhere.
What sets this cake apart from, say, a regular cheesecake or chocolate cake, is its lightness The mousse ain’t heavy or dense; it’s fluffy and refreshing, thanks to the whipped cream magic Plus, the mango brings a natural sweetness with just the right hint of tang, makin’ it perfect for those who don’t wanna overdose on sugar. And if you’re usin’ top-notch mangoes—or even high-quality canned puree—you’re in for a real treat.
Now I ain’t gonna lie this cake looks fancy as heck, like somethin’ you’d see in a high-end bakery window. But don’t let that scare ya! It’s totally doable at home, and I’m gonna walk you through it step by step. First, though, let’s chat about why mangoes are the real MVP here.
Why Mangoes Make This Cake Irresistible
Mangoes, y’all, are the king of fruits for a reason. They’ve got this crazy juicy, sweet vibe with a tiny bit of tartness that just dances on your taste buds. Depending on the variety, you might get different flavor notes—some are super creamy, others more citrusy. I’ve tried a bunch over the years, and lemme tell ya, pickin’ the right mango can elevate your mousse cake from “pretty good” to “holy cow, gimme another slice!”
Here’s a quick rundown of some popular mango types you might wanna consider for your cake:
- Alphonso: Known as the “king of mangoes,” it’s got a rich, creamy texture and intense sweetness. Perfect for a luxe mousse.
- Kesar: Another gem with a saffron-like aroma and a smooth, sweet pulp. It’s my go-to for a subtle, exotic twist.
- Carabao: Often used in premium desserts, this one’s super sweet with a hint of tropical zest. It’s like sunshine in fruit form.
Now, if fresh mangoes ain’t in season or you don’t wanna deal with peelin’ and blendin’, canned mango pulp works just as good. I’ve used it plenty of times, and it saves a ton of hassle without skimpin’ on flavor. Just make sure you’re grabbin’ pure pulp, not some sugary nectar or juice that’ll mess with the texture.
How to Make Mango Mousse Cake at Home
Alright, let’s get down to business. Makin’ a mango mousse cake might sound intimidatin’, but I swear it’s easier than it looks. It’s all about breakin’ it down into three main parts: the sponge cake base, the mango mousse, and the gel topping. I’m gonna share the way I do it, based on my own kitchen adventures. We’ll keep it simple, with stuff you’ve prob’ly got lyin’ around or can grab at the store easy. Let’s roll!
Ingredients You’ll Need
Before we start, here’s a handy table with everything you need. This makes a cake that serves about 10 folks, dependin’ on how generous your slices are.
| Component | Ingredient | Quantity |
|---|---|---|
| Sponge Cake | Eggs (room temp) | 3 large |
| Sugar | 1/2 cup | |
| All-purpose flour | 1/2 cup | |
| Baking powder | 1/4 tsp | |
| Stock Syrup | Water | 1/4 cup |
| Sugar | 1/3 cup | |
| Mango Mousse | Heavy cream | 1.5 cups |
| Icing sugar | 3-6 tbsp (to taste) | |
| Mango puree (canned/fresh) | 2 cups | |
| Unflavored gelatin powder | 1 sachet (7g) | |
| Water | 50 ml | |
| Mango Gel Topping | Mango puree (canned/fresh) | 1 cup |
| Sugar | 3-6 tbsp (to taste) | |
| Unflavored gelatin powder | 1.5 tsp | |
| Water | 7 tsp |
Got all that? Cool, let’s get bakin’!
Step 1: Whip Up the Sponge Cake Base
The sponge cake is the foundation of our masterpiece, and it’s gotta be light and fluffy. Here’s how I do it:
- Preheat your oven to 350°F (that’s about 175°C if you’re usin’ metric). Grease the bottom of an 8-inch round springform pan and line it with parchment paper so the cake don’t stick.
- In a big mixin’ bowl, beat them 3 eggs with a stand mixer or hand mixer for about a minute till they’re foamy. Then, slowly add in the 1/2 cup of sugar, keepin’ at it for 7-10 minutes. You’re lookin’ for the mix to triple in volume and turn pale. Test it by liftin’ the beater—if the batter falls back in ribbons that don’t sink right away, you’re golden.
- Sift the flour and baking powder over the egg mix in small batches. Fold it in gently with a spatula after each addition. Don’t overmix, or you’ll deflate all that air you just whipped in. Scrape the bottom to make sure no flour’s hidin’ down there.
- Pour the batter into your pan and bake for 20-25 minutes, or till a toothpick poked in the center comes out clean. The top should be lightly golden.
- Let it cool a bit in the pan, then pop off the ring and transfer the cake to a wire rack to cool completely. Keep the parchment on for now. Once it’s cool, peel off the paper, put the cake back in the pan, and lock the ring back on.
Quick tip: While the cake cools, make a simple stock syrup by boilin’ the 1/4 cup water and 1/3 cup sugar till it’s syrupy. Let it cool, then brush just enough over the cake to keep it moist. Don’t drown it—you might have some syrup left over for other desserts.
Step 2: Create the Dreamy Mango Mousse
This is where the magic happens, fam. The mousse is what gives this cake its signature airy texture. Let’s do this:
- Whip the 1.5 cups of heavy cream with 3-6 tablespoons of icing sugar (adjust based on how sweet ya like it) till you get stiff peaks. It should look thick and fluffy.
- Fold this whipped cream into your 2 cups of mango puree bit by bit till it’s all one smooth, even color. Pop it in the fridge for a sec while you deal with the gelatin.
- In a small microwave-safe bowl, mix 50 ml of water with the gelatin powder. Let it sit for a minute, then zap it in the microwave for 15 seconds till it’s clear. If it ain’t fully dissolved, give it another 5 seconds. Let it cool just a tad.
- Scoop out about 1/4 cup of your whipped mango mix and stir it into the gelatin to temper it. Then, fold this back into the big bowl of mango cream. Stir well so there’s no lumps.
- Pour this mousse over the sponge cake in the pan. Let it spread out naturally to cover the whole top. Stick the pan in the fridge for at least 8 hours—or overnight if you can wait that long—till the mousse sets firm.
Pro tip: Don’t rush the settin’ process. If it ain’t firm, the next layer will mess it up. Patience is key here!
Step 3: Add the Shiny Mango Gel Topping
This last layer is like the cherry on top—except it’s mango, and it’s freakin’ gorgeous. Here’s the deal:
- Mix 1 cup of mango puree with 3-6 tablespoons of sugar, dependin’ on how sweet your puree is. Taste it and tweak as needed.
- In a tiny bowl, sprinkle 1.5 teaspoons of gelatin over 7 teaspoons of water. Let it sit for 30 seconds, then microwave for about 10 seconds till it’s clear. If it needs more time, do 5-second bursts.
- Take 2 tablespoons of your mango-sugar mix and stir it into the gelatin to temper it. Then, pour this back into the rest of the mango mix and stir till smooth.
- Gently pour this over the set mousse layer. Pop the cake back in the fridge for another 2-4 hours till the gel is firm and shiny.
And there ya have it! Once it’s all set, you can pop off the springform ring and show off your stunner of a cake. Slice it up and watch everyone’s jaws drop.
Tips and Tricks for Mango Mousse Cake Success
I’ve made this cake a buncha times, and lemme share some nuggets of wisdom to keep things smooth:
- Fresh vs. Canned Mangoes: If you’re usin’ fresh, you’ll need about 6-7 big ones to get 3 cups of puree. Blend ‘em up, and if they ain’t sweet enough, simmer with a bit of sugar till it dissolves. But honestly, canned pulp is a lifesaver and tastes just as dope.
- Gelatin Game: If you’re new to gelatin, don’t stress. Just make sure it’s fully dissolved before mixin’ it in, or you’ll get weird clumps. And don’t let it cool too much before addin’ to the mousse, or it’ll start to set on its own.
- Pan Size: An 8-inch springform works best, but a 9-inch will do if that’s all ya got. Just know the layers might be a tad thinner.
- Settin’ Time: Mousse can set in as little as 6 hours sometimes, but I always give it 8 to be safe. You’ll know it’s ready when it don’t jiggle when you nudge the pan.
Why You Gotta Try Mango Mousse Cake
If you ain’t sold yet, let me hit ya with a few more reasons this cake deserves a spot in your dessert lineup. First off, it’s a total showstopper—perfect for birthdays, anniversaries, or just impressin’ your crew at a potluck. The tropical flavor is a nice switch-up from the usual chocolate or vanilla, and it feels like a lil’ escape to somewhere warm and sunny.
Plus, it’s versatile as heck. Wanna add a twist? Toss in some passion fruit vibes with the mango for an extra zing. Or, if you’re feelin’ wild, crumble some white chocolate on top for crunch. I’ve even seen folks pair it with a scoop of coconut ice cream on the side—talk about next-level!
Servin’ and Storin’ Your Cake
When you’re ready to serve, keep it chill—literally. This cake is best straight outta the fridge, as the mousse stays nice and firm. Use a sharp knife to cut clean slices, and maybe run it under hot water for a sec if it’s stickin’. Garnish with fresh mango chunks or a dollop of whipped cream if you’re feelin’ fancy.
Got leftovers? (Yeah, right!) Wrap ‘em tight or store in an airtight container in the fridge. It’ll stay good for 3-4 days, though the texture might soften a bit over time. I wouldn’t freeze it, though—the mousse can get weird and grainy when it thaws.
A Lil’ Mango Love Story
I gotta confess, mangoes hold a special place in my heart. Growin’ up, summer meant sticky fingers and mango juice drippin’ down my chin. My fam would always have a stash around, and we’d fight over the last piece. Turnin’ that childhood fave into a fancy dessert like this feels like a full-circle moment. It’s like I’m honorin’ those memories with every slice.
I remember the first time I made this cake for a friend’s birthday. I was nervous as heck—would it set right? Would they like the flavor? But when they took that first bite and their eyes lit up, I knew I’d nailed it. Now, it’s my go-to for any celebration, and I’m stoked to share the recipe with y’all.
Let’s Get Tropical Together!
So, whatcha waitin’ for? Mango mousse cake ain’t just a dessert; it’s an experience. Whether you’re a baking pro or a total newbie, I’m bettin’ you can pull this off and impress the pants off everyone. Grab some mangoes—or that can of pulp sittin’ in your pantry—and let’s make some magic happen.
If you give this a whirl, drop a comment below or tag me in your pics. I’m dyin’ to see how yours turns out! And if you’ve got your own twists or fave mango varieties, spill the beans—I’m all ears. Let’s keep this tropical party goin’, fam!
How to assemble
Building up this Mango mousse cake is super simple;
- Cook a very amount of mango puree with sugar for a few minutes, until slightly thickens
- Assemble the Mousse cake ring (adjustable in size) and set it to 18cm / 7 inch that is equal to the size of your sponge cake
- Place the sponge cake into the mousse ring. Make sure that the cake ring tightly sits around the sponge cake
- Pour or pipe mango mousse on top of the sponge cake
- Smooth the top with an Offset spatula
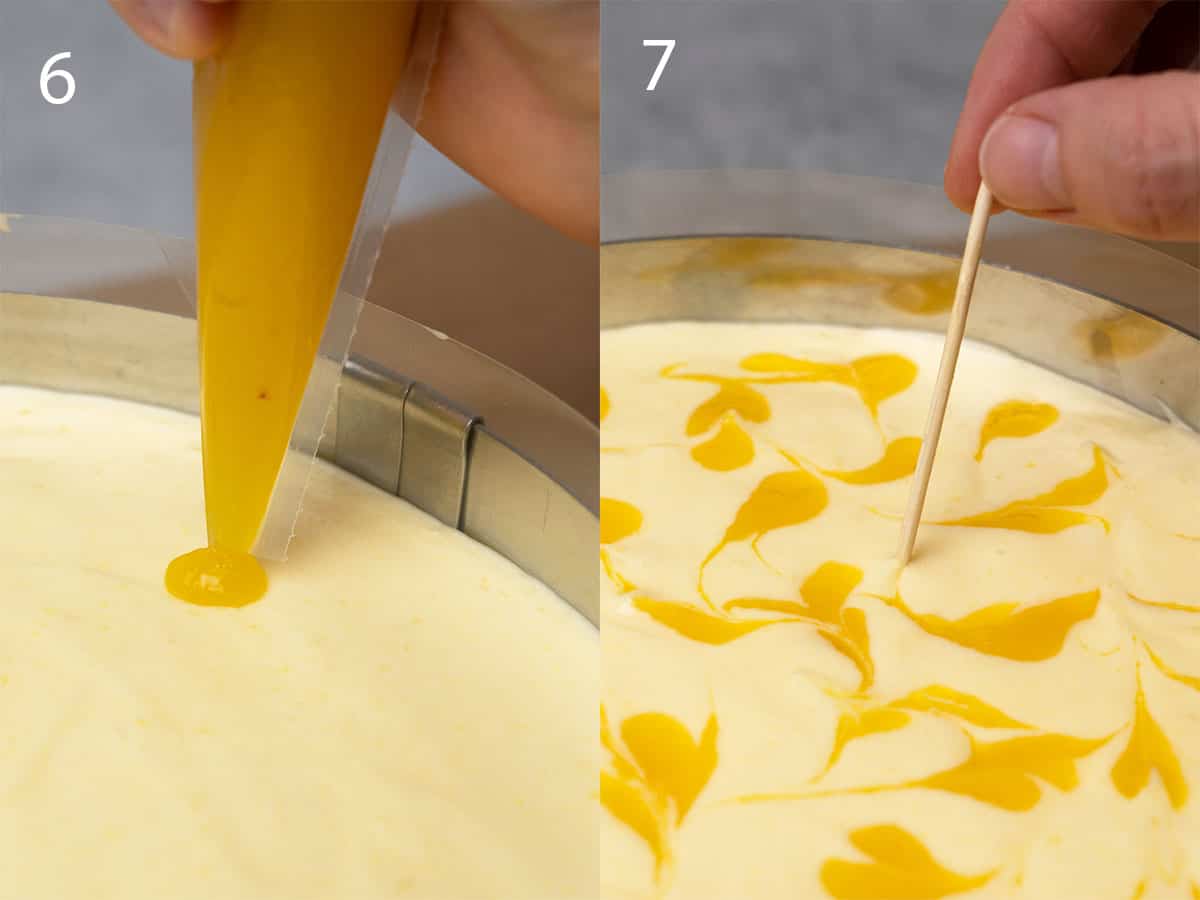
- Move the reduced mango puree into a Piping bag, make a very small hole on the piping bag and pipe small dots on top of the cake. Alternatively, use a small spoon to allocate the reduced mango puree
- For the marble effect, grab a toothpick and gently swirl the mango puree into the mango mousse
- Refrigerate the Mango mousse cake for a minimum of 6 hours to fully set before opening the cake ring
Top Tip: For a neat looking, smooth side surface, consider using Acetate cake collar within the cake ring
As usual, decoration is totally optional but I think it really takes this Mango mousse cake recipe to the next level and it is so easy!
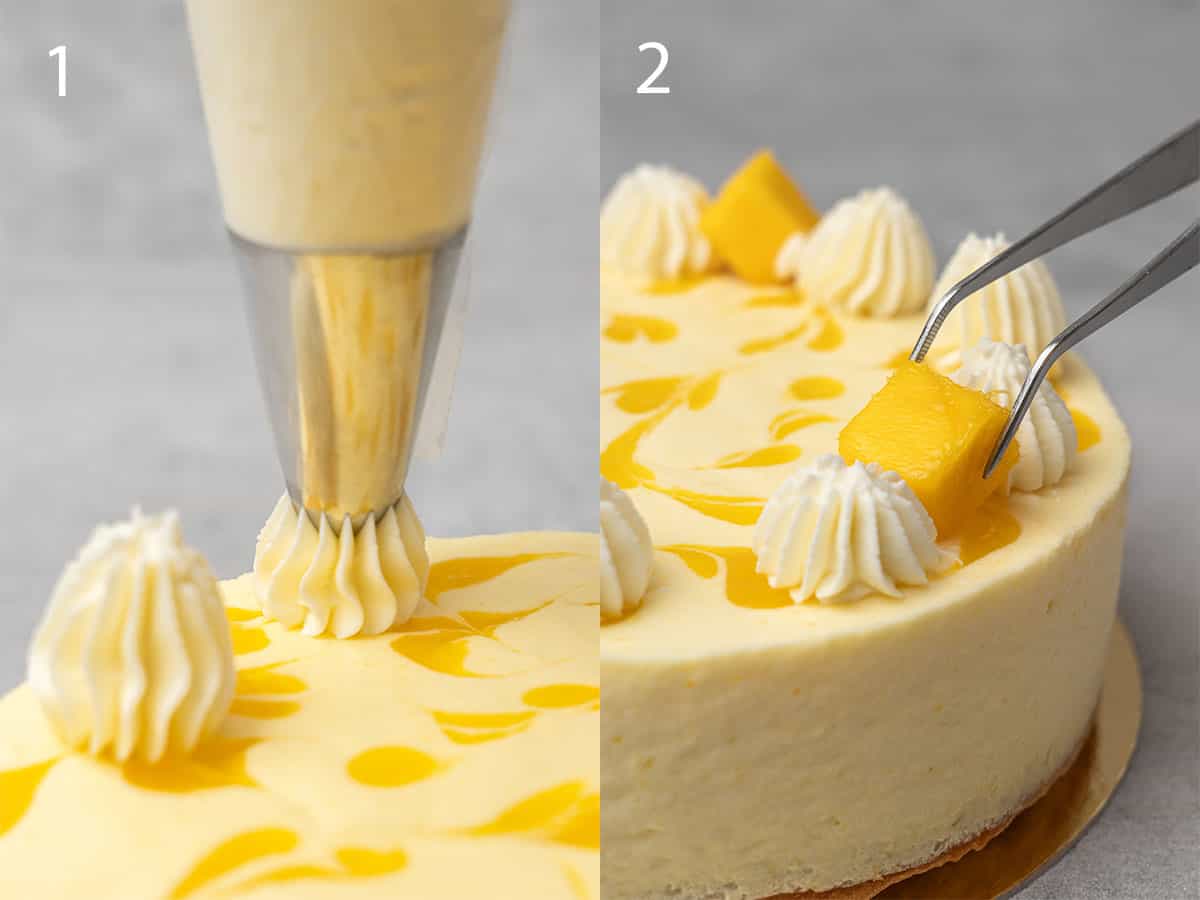
- Whip up a small amount of cream cheese frosting then move it into a Piping bag fitted with your favorite nozzle tip. The one I am using is Wilton 6A
- Pipe the frosting on top of the cheesecake then place some mangos in between the pipings. Lastly, decorate with some greens (eg. mint or rosemary)
Voila, your Mango mousse cake is ready to be served!
For making the sponge, a 18 cm / 7 inch round cake pan is perfect. For assembling the mousse cake, you will need a cake ring, I am using a Mousse cake ring (adjustable in size) set to 18cm / 7inches (the size of the sponge). I use this cake ring all the time also for making my signature tall cheesecake crust
How to make the side of the cake neat? Acetate cake collar is the secret! Its an inexpensive pastry chef hack that you can purchase from Amazon and just makes all the difference! Once the cake ring is set, place the Acetate cake collar inside the ring and start building the cake up from the bottom to top as stated in the recipe.
For a consistent, happy baking experience always measure your ingredients with the help of a Digital scale. This is absolutely a MUST!
Last but not least, Rubber spatula will be useful whenever the recipe states “folding”.
- While making the sponge, make sure all ingredients are at room temperature for proper emulsification
- Do not over bake your sponge as that would result in a dry texture
- If using sweet enough mango, you can easily skip the sugar in the mousse and turn it sugar-free
- An inexpensive Rubber spatula is super useful whenever “fold” is mentioned in the recipe. With the help of your spatula, you will be able to fold the cream gently without breaking it
- Mango can be easily substituted in the recipe with strawberry or raspberry and that would make a wonderful Strawberry mousse or Raspberry mousse cake
- Feel free to experiment with flavor pairings eg. use citrus zest in the sponge, and a small amount of citrus juice in the mousse (heat it up along with the mango puree). Another great flavor combination can be replacing 25% of the flour with coconut flour making it a coconut sponge
Yes, you can use traditional equipment (eg. springform pan), but the mousse ring is adjustable in size so you can use it no matter the size of the cake
Yes of course you can, this recipe works no matter what size or shape of cake you want to bake, however, you will need to adjust the baking time and ingredients accordingly
Yes, most probably you can, however, you can´t just replace ingredients without reformulating the recipe. When one ingredient changes, some other ingredients need to be changed too in order to keep the balance in the texture and flavor. Sadly, I am not able to provide substitutes for all sorts of allergies and diets
Yes, you can, however, you will need to use another thickening agent eg. agar-agar
The mousse is quite runny when assembling this cake, however, the gelatin will make it set in the fridge. If your mousse has not set, maybe it needs more time in the fridge, or perhaps your measurement was off eg. you used less gelatin than stated in the recipe
Once you assemble the Mango mousse cake, it should be stored in the fridge. I suggest you cover the cake to make sure it does not absorb any smell from the fridge. Leftover cake – if there is any – should be stored in the fridge for 1-2 days in an air-tight container.
I do not recommend freezing this cake as the texture might change after thawing
For the buttery sponge
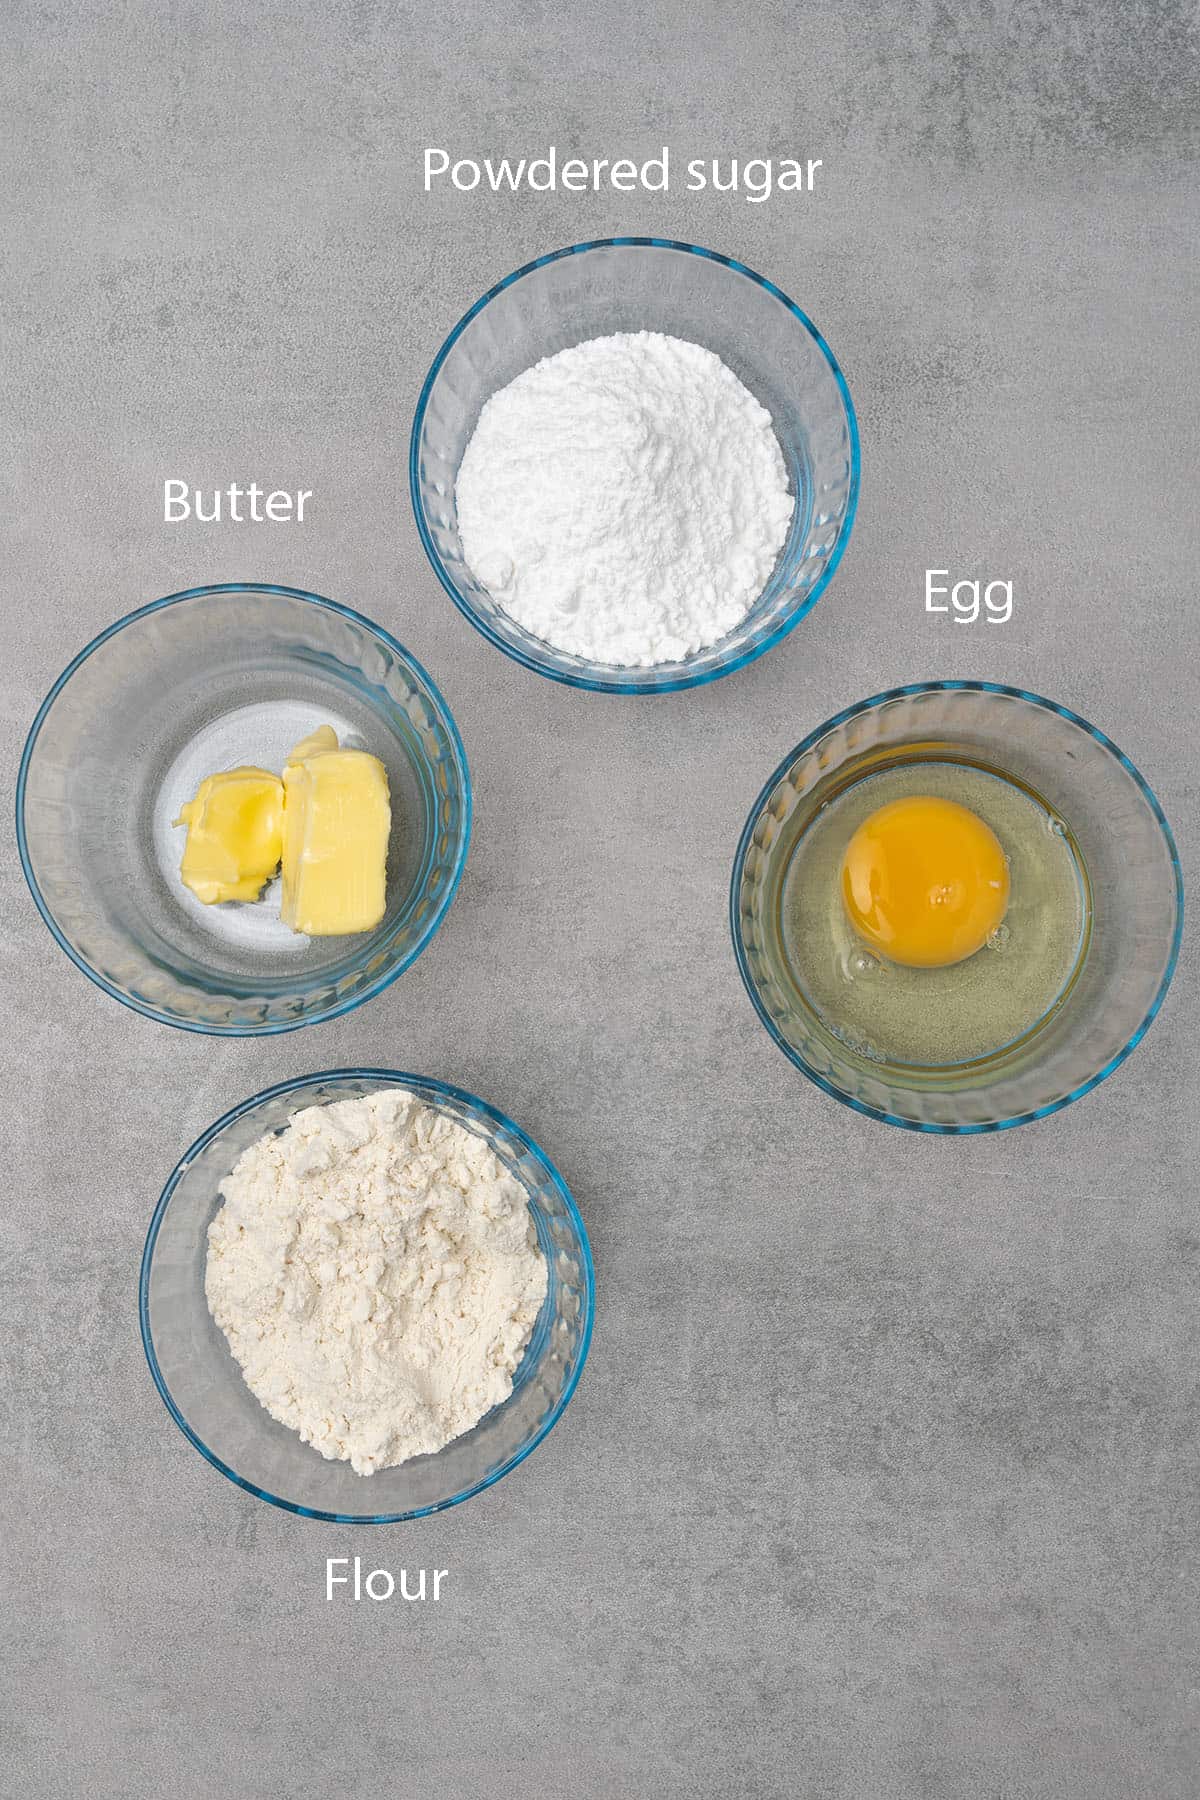
- Butter: Use always unsalted butter as you want to be in control of the quantity of the salt. I am using 82% fat content European-style butter in all my recipes. For the sponge, the butter needs to be at room temperature which technically means soft enough to be able to cream but not too soft or runny so avoid last-minute microwaving
- Powdered Sugar: Use powdered sugar/icing sugar. If you want to learn about the different types of sugar and how to use them in baking, please read sugar guide
- Egg: Use room temperature eggs, as almost always in baking
- Vanilla: Please avoid using artificial vanilla. There are several great brands for fine, pure vanilla, I use Nielsen massey which I love and really recommend. I use vanilla bean paste instead of vanilla extract which has lovely vanilla bits in there too
- Flour: All-purpose flour or pastry flour works well to make the sponge part of this Mango mouse cake. They are so-called “soft flour” which are low on protein resulting in a delicate, tender texture. If you want to be a Pro when it comes to deciding what types of flour to use in your baking, please read my flour guide
- Salt: An essential ingredient in most dessert recipes. Balances flavor and enhances other ingredients, make sure you do not left it out
- Baking powder: No baking powder is needed in this sponge recipe. What we are making here is a relatively thin layer of sponge to hold the cake, this kind of sponge is very often used on mousse cakes. In contrast to traditional tall, airy sponge cakes, our sponge will be rather buttery and dense yet soft and moist.
You’ll find detailed measurements for all Ingredients in the printable version of the Recipe Card at the bottom of this post
Mango Mousse Cake: A Refreshing and Delicious No-Bake Dessert Recipe
0